Zerrtech Blog

REACT SERVER SIDE RENDERING MADE SIMPLE

2019-05-17

React Server Side Rendering doesn’t really need to be that complicated…

I set out to prove that I could go straight from a Create React App site to SSR without adding a bunch of 3rd party libs. Makes it much easier to understand exactly what is going on.

Most of the other React SSR articles I see use Redux, but not every app uses Redux. I didn’t want to impose that design restriction on making SSR work.

I want to show that React SSR can work:

  • without Next.js

  • without Redux

The Plan

  • Start with a React project started from Create React App that has some API calls, defines title tag, and a couple routes

  • Show what problem we are trying to solve and how we would like to solve it

  • Evolve the app into a React Server Side Rendering, showing the challenges encountered along the way

The App

Title Tags

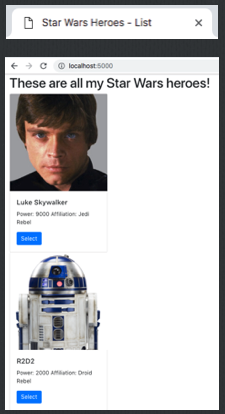
On the main page, I want it to have the title tag “Star Wars Heroes - List”

On the Detail page I want to have it include the name of the hero, like “Star Wars Heroes - Luke Skywalker”

API Calls

On the main list page, we call /heroes to get a list of all the heroes.

On the individual detail page, we call /heroes/0 to get a single hero.

As Yoda famously says…

Code

The code is on Github at Zerrtech/zerrtech-react-ssr-demo

4 branches, 1 for each iteration

  1. step-1-normal-app

  2. step-2-ssr-initial

  3. step-3-ssr-server-seed

  4. step-4-ssr-api

Step 1: Initial App Demo

Branch: step-1-normal-app

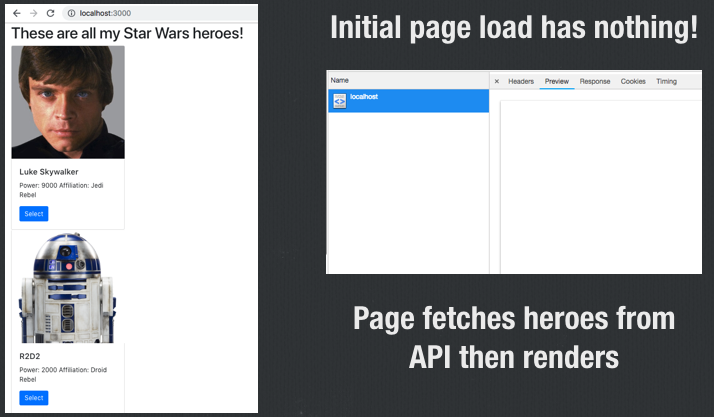
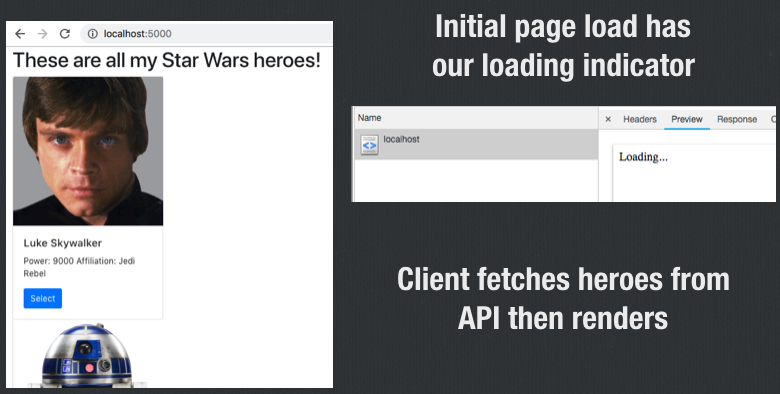
To most easily see what the page fetched from the server contains, pop open your dev tools (I’m using Chrome) and click on the very first request. Check out the Preview tab which will render it as HTML. Ummm, yeah, it’s blank. It’s supposed to be.

This empty initial page load is by design.

It’s a Single Page App (SPA) after all.

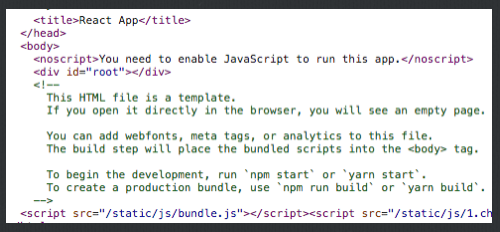
React renders the app into the div id=”root”

What’s wrong with that?

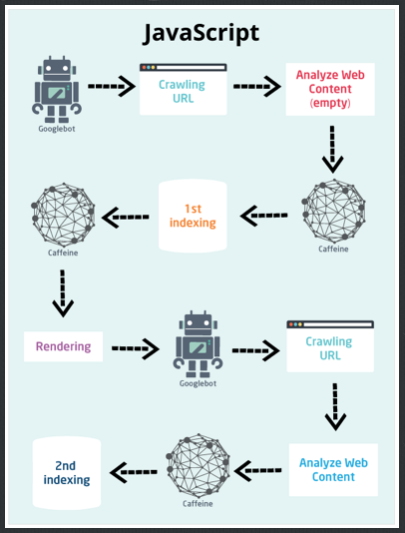
Google can crawl Javascript on a page, but it takes extra steps and can delay full indexing since they have to wait for rendering by doing two passes.

Performance wise, one trip to the server is quicker than N trips to the server to generate a page, especially in mobile where the maximum number of parallel requests is smaller and connections are slower.

Combined with SSR caching, this can mean that each page is only rendered once and used by many users.  Loading indicators added while waiting for API calls wouldn’t really show up.

One negative with SSR is that it will take more time to get to the first usable content. After all, delivering a blank HTML page is pretty quick. Then you can use loading indicators to indicate progress. This is opposed to waiting until the entire page is rendered before showing anything.

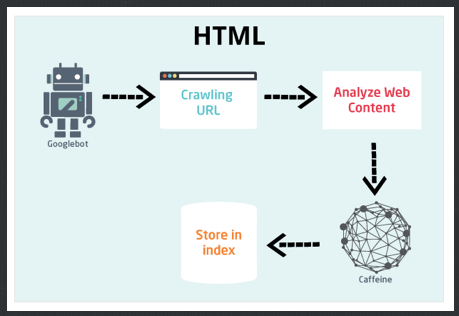
Rendering a HTML-only page

Image from SEOpressor

Rendering a Javascript Single Page App

Image from SEOpressor

Google uses Chrome 41 to crawl your pages.

I have version 71

Take a look at the differences by looking at Can I Use - 41 vs. 71

Use the Google Search Console to Fetch as Google (or new Search Console URL Inspection). You need to be the owner of your domain to do this, can’t just check out someone else’s page.

Read up on this at the Google Search Rendering Guide.

Why don’t all sites do Server Side Rendering then?

  • It’s good for content-heavy, largely publicly accessible apps, where SEO is hugely important.

  • If most of your content is behind a login, then SSR can’t get at it either.

  • A proper SSR implementation would use a layer of caching, so if you have data that absolutely needs to be as up to date as possible, there will be some tuning to do with caching vs. up to date data access.

  • Requires redesigning data fetching within components, ideal solution is specific to your app, no generic solution

Wait!!! Weren’t all sites like this in 1999?

How does React rendering normally work?

  • A user types your home page URL into the browser

  • Browser sends a request to the server for your home page

  • HTML for home page is returned to Browser, but has a blank content body and links to scripts/CSS

  • React boots up in Browser, renders the home page

  • Browser React component may fire off API requests that when they return, causes another React render

How does React Server Side Rendering work?

  • A user types your home page URL into the browser

  • Browser sends a request to the server for your home page

  • Server fetches data needed for the home page, seeds your component state, renders your React components, gets the HTML created by them, stuffs it into your React root in index.html and returns it to the browser

  • React boots up in Browser, realizes everything was already rendered so has no changes (virtual DOM)

  • Browser React component does not need to fire off API calls because they were already done on the server

Step 2: Initial SSR

Branch: step-2-ssr-initial

Notice here that the difference is that the HTML page in the debugger shows “Loading…”, our loading indicator. Yeah, I know, not much change. Just stick with me, we’re building this thing step by step.

We aren’t doing any API calls on the server in this initial step. But we got some React rendered by the server, enough to render our loading indicator.

Initial SSR Code Changes

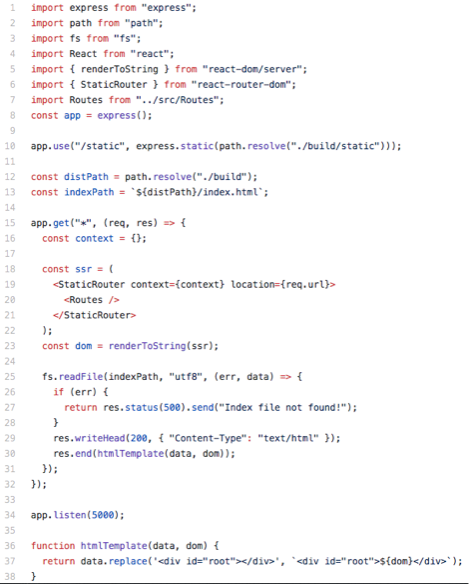
In this step I added the server script. It is:

  • NodeJS Express

  • Babel compiled

  • Uses React DOM Server renderToString and StaticRouter

You first build the React production build the usual way: yarn build

Then the SSR server is started using: yarn start:ssr

Code diff - step 1 vs. step 2

Static files are served out of the build directory

We load our Routes under StaticRouter instead of BrowserRouter that we would normally use in the React frontend.

We grab our index.html and stuff our HTML in

Step 2 - server.js

Initial SSR Review

  • Notice no API calls were done within SSR

  • The render is synchronous, makes one pass through then returns what it has

  • Fact: when doing SSR, componentDidMount is not called

  • We need to do our API calls on the server, then seed our state within our component so SSR can do the full page

Step 3: SSR Server Seed

Branch: step-3-ssr-server-seed

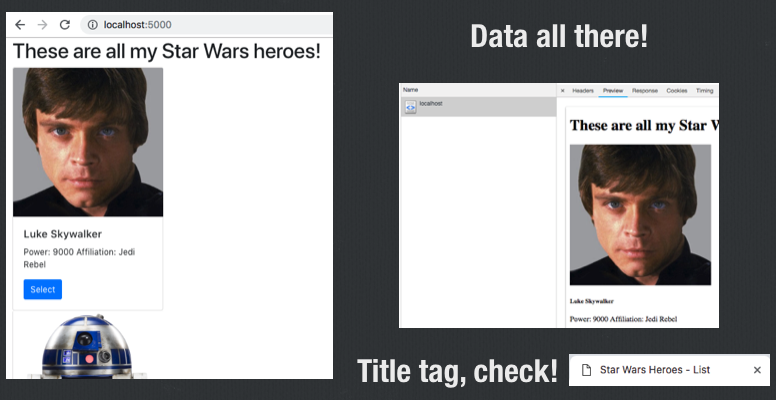
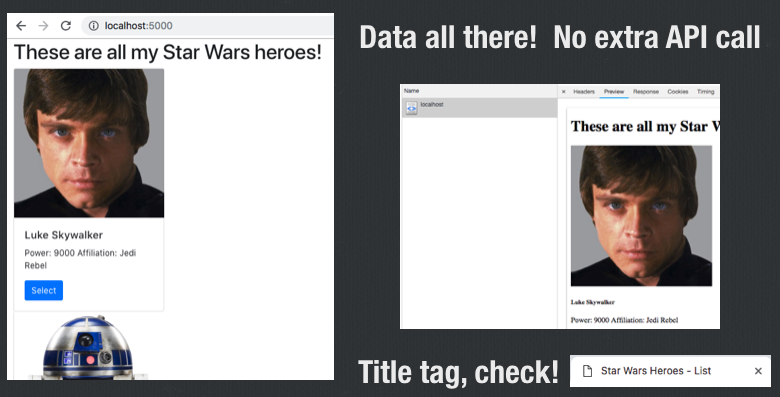
Now we can see in the preview window that all of our content is there on the initial page load, and the title tag is there too! Booyah!

SSR Server Seed Code Changes

  • Added fetching data into the server script by using a static method on each route component

  • Pass the data into the component using StaticRouter context param

  • Render Helmet and replace in HTML

Code diff - step 2 vs. step 3

SSR Server Seed Data Fetching

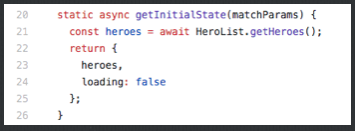
Static method called getInitialState() added into Route component.  Static so it can be called on the server easily.

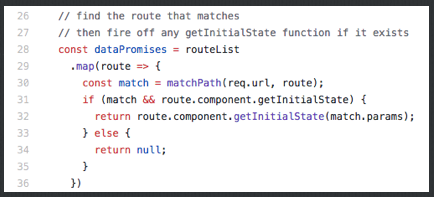
Server looks for a matching route and a getInitialState method, if so calls it

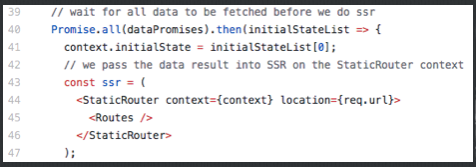
We wait for API calls to be done then add data to context passed into StaticRouter

Back in the Route component, we look for that data and merge into state in the constructor.

staticContext is provided by React router withRouter()

SSR Server Seed Review

OK great, but now we are wasting our API call on the frontend, how do we prevent that?

We’ll put that same initialState in our index.html so on the client side, we can also seed that data and avoid the API call

Step 4: SSR API

Branch: step-4-api

SSR API Code Changes

  • Add a placeholder in index.html we can stuff our initial state into

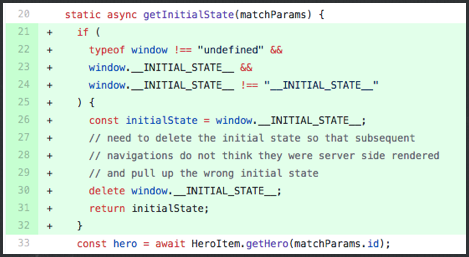
  • Check for this existing data in our static getInitialState() method

  • Delete the data after we use it so other pages don’t use it

Code diff - step 3 vs step 4

SSR API - API Call Saving

Add a variable in index.html

Server will stuff initialState into that var

HeroList getInitialState(matchParams) checks for existing data

React Server Side Rendering Summary

  • Demo of React SSR from create react app without ejecting webpack config

  • Showed how to use SSR on an app that has async API calls and dynamic title tags

  • Implemented where SSR is used and we also eliminate the client side API calls for max efficiency

AS GOOD AS 1999? DEFINITELY!

Next Steps

  • Great opportunity to build a generic SSR React component for Route components to inherit from

  • Encapsulates all that window and staticContext stuff to make it easy on devs.

  • Put caching in front of SSR so that you aren’t running SSR on the page every time

  • React Suspense API has high hopes to make it easier to identify those async API calls and make SSR easier


REACT DESIGN BEST PRACTICES

2018-06-13

Our software consulting life with Zerrtech has found us designing quite a few React web apps for clients.  The first modern JS framework we used to build complex web apps was Angular 1, but now we find it easiest to follow good front-end development design patterns in React.

As a part of creating quality standards for the React apps that we architect, we wanted to collect all of the design best practices from the many React apps we've designed into one place.  We gave a presentation on this at the Boise Frontend Development meetup in June 2018.  Here are the slides we used in PDF form.  We plan to have this document be an evergreen document that evolves with us as our experience grows, so we'll keep it up to date periodically.

Could you use any software help?  We would love to bring our experiences designing React apps to your team.  Connect with me, Jeremy Zerr, on LinkedIn and let's chat!

React has really gained a lot of traction with frontend web developers.  It makes it easy to follow design patterns that have evolved over the years.

React Design Best Practices - Overview

  • General Design Considerations

    • Our Philosophy - practical and centered around education

    • Ways to improve code

  • Project Setup/Structure

    • Boilerplates - create-react-app

    • Package Manager - yarn and use lock files

    • Node Version Manager - reproducable node version

    • Code style - automate

    • Styling approach - CSS files

    • Folder structure - Fractal

  • Project Code

    • Use Redux - manage data complexity, use Action Creators, use immutable data

    • Use Babel-Polyfill

    • Error Handling

    • Version Checking - get those new code changes to users

    • Kinds of Components - choose the most simple and performant you can

    • Handling Side Effects - thunks, sagas, and epics oh my!

    • Routers - redux-first router is great!

    • Testing - it's complicated

    • Documenting in Code - do it!  Typescript can help on some projects

Our Philosophy

Be practical - know the ideal but be realistic.

Our projects involve designing real software for real clients with budgets and timeline constraints.  We can serve best when we know the ideal but know what can be sacrificed to meet real world demands.

Don't require devs to remember a bunch of rules.

We all have more important things we need to think about, like solving hard problems in elegant ways.  Trying to memorize a bunch of rules is a sign of not using the right tools or systems.

Use tools that encourage education

A developer's intuition about how to code better and follow best practices shouldn't require taking the creativity out of the art of coding.  Over time, tools and editors can help make it so that best practices become second nature.

Don't be so set in your ways

Question the process, any list of best practices is rather fluid, some do not fit on every project.

Learn from the mistakes of others

Meetups and colleagues are great resources.  Of course experiencing pains yourself does wonders!

Ways to improve code (in general)

Questions to ask yourself while coding

Could I have prevented this bug from happening?

What did I do to cause this difficulty?  Take responsibility don't blame others

Learn from refactoring and do it better the first time on the next project

Look out for code smells (some that are common in React)

Duplicated code

Large classes

Too many arguments/attributes

Lines that are too long

Your linter should help grow your intuition on these so they become second nature

Project Setup/Structure Best Practices

Using create-react-app vs. other boilerplates

You have got to admit it, create-react-app really helped our community out.  You can focus all day on what it does NOT have, but it really gave our community a boilerplate to rally behind.  Just as important was designing a system to extend that boilerplate and keep up to date with library updates.  Other boilerplates traditionally have difficulties keeping up and rely so much on the maintainer to keep them up to date.

It sets up your app the official way the React maintainers think is the best way to set it up and is currently the most well-documented boilerplate we’ve ever seen.

Makes it easy for us to hand off to clients something that already starts with great docs and developer familiarity.

Confident that it will be well supported in the near future

It’s ejectable: if a project requirement requires some overrides, you can eject to expose the underlying config files and customize away!

Use a Package Manager with a Lock File

It is important to choose a package manager that uses a lock file.  A package manager always has a file (package.json for JS projects) that lists all of the packages you need and the versions, but the versions you specify usually are not exact down to the patch number.

A lock file specifies which exact versions of the packages that were built up based on the package file.  If you don’t have a lock file, when you spin up that project from scratch next year to make a change, it almost certainly will have some packages that don’t work together and send you down a rabbit hole.

Utilizing a lock file ensures that you can make that critical change on the project without having to figure out a bunch of package dependencies, you get to focus on adding value, not wasting time on package management.

When yarn wasn’t around we used npm along with npm shrinkwrap which created a lock file.  However, the act of running shrinkwrap was not automatic, it was an extra step, and easy to skip.

We originally choose to use yarn because it implemented a lock file automatically. This allows us to document the exact version of each package we use in development, guaranteeing reproducibility of the code in production and in other developers’ environments. Of course, this was recently added to npm v5.0, so they now both include this feature.

Yarn is also substantially faster than npm due to its ability to install packages in parallel.  Here are some benchmarks.

The intention is to commit the lock file into git

Also, it might seem obvious, but you need to make it clear which package manager you use.  You don’t want one dev using yarn, one using npm, because each uses a different lock file and if both get committed into the repo, it can lead to confusion, errors that are hard to catch.

Node Version Manager (nvm)

Javascript projects are notorious for being very vague around nodeJS requirements, usually just saying nothing, or using a >= major number.  That is problematic because ultimately a year in the future, the latest version of node might have an incompatibility.  I mean really, who even knows?

Upgrades of packages should be for good reason, not just for the heck of it.  We like to get specific around what exact version for the same reproducibility reasons as a package lock file.

We choose to use NVM and a .nvmrc file in our codebase for the same reasons to have a lock file: reproducible environment. Here is an example:

It makes it really easy for a developer new to the code base to get up and going.

Code Style

Our philosophy is to enforce code readability and consistency across developers while not burdening the developer by being required to memorize style/formatting rules. We accomplish this by implementing Linter and Editor Config files in all projects.

Linter

We use the linter built into create-react-app in our .eslintrc files.

You don’t have a lot of flexibility to customize the linter rules within create-react-app “yarn start” console warnings unless you eject.  We often don’t eject, so we implement our own in a .eslintrc file and use our editor to help us with that.

VS Code you can install the “ESLint” extension.

You can then add more strict rules than what is by default used in the create-react-app defaults, but you use the editor to show them, it won’t show up in the cmd line console for "yarn start".

Editor Configuration File

We use an .editorconfig file to define and enforce several formatting rules within the editor, like spaces and end of line/end of file newline.

In VS Code you need to install the “EditorConfig for VS Code” extension.

We are growing more comfortable with automatic code formatters on save, like "prettier".  It is really best to start off a project with it instead of introducing later, when you might get big commit diffs that are just code style changes.

Starting to see what code transforms take place has a great side effect of educating the developer on the changes necessary to meet code style guidelines, like in-editor linter feedback, so that there is some education that can be done.

Styles (.css files vs. CSS-in-JS)

We prefer CSS files or CSS-in-JS, CSS modules, or inline styles.  But this choice is often one of those that is highly project dependent.

It's typically easier for designers to modify CSS files, as no JS/React knowledge is necessary.

We still split up the styles so we have one CSS/LESS/SASS file per component and include them alongside the component within the folder structure.  We'll go through that folder structure later in this post.

While there are some benefits to putting styles/CSS in JS and/or applying them directly to components, we prefer CSS/LESS/SASS files since many of our projects go on to be maintained by our clients, often by designers trying to update things. Often times, it is dictated by the clients that they don’t want designers to have to understand React or JS, but CSS/LESS/SASS files any designer can understand and easily change things by finding the class name with a simple inspect in the browser.  This all really depends on the technical capability of our clients.

Here are some examples of these different types of styling within React.

CSS files

Here is a sample CSS file

Here is how to use it within JS

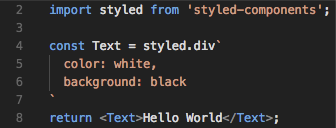
Styled Components

Styles inline

CSS Modules

CSS file

JS file

CSS Preprocessors (LESS vs. SASS)

We choose the one that is most popular with the libraries we use

Bootstrap v2/v3 used LESS so we have used LESS

Bootstrap v4 uses SASS so we plan to use SASS more often

Leave the generated CSS files and maps out of repo/codebase

When using “import ‘./mycomponent.css’” in components, avoid CSS naming collisions by using a unique className on component’s parent element

Folder Structure


Folder structure is hard to really say there is the "one" or a "perfect" folder structure.  This is one of the design best practices where there are strong opinions.  The goal is to have something that makes sense and another developer would come in and identify a pattern right away and find it easy to follow.

We make it so that all components have their own folder.  This contains all related code and styles.  If there are any sub-components, they can also be included in sub-folders.  This is most commonly referred to as a "fractal" structure, where each component folder would look the same with directory structure and types of files.

Here is a sample folder structure:

We put the React component code in a named ".js" file, not a ".jsx" file, that is not recommended.  In the structure above, the example of that would be "src/components/Home/home.js", that contains the component code for the "Home" component.  This helps us with stack trace and editor readability over a structure of putting everything in an index.js file within each component folder.

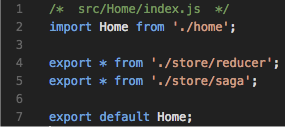
We reserve the index.js file only for doing exports.

With an index.js file like this:

We can then improve how our imports look:

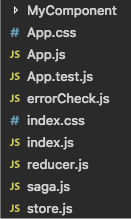
An example of that folder structure collapsed:

Why we chose this structure:

  • It scales well

  • Locality of all related code and styles

  • Consistency of file types within each component folder

Project Code Best Practices

Use Redux in Most Cases

We use Redux almost exclusively to manage state within our apps.

Having one-way data flow coupled with the React Virtual DOM provides a great pattern for performant web apps.

Redux + Redux Dev Tools === Awesome

There are a few apps we have created that don't use Redux, that's usually a decision based on how much data we are storing and pulling in from an API.  However, since most apps rely on data from an API, and the more complex the data is, the more benefits you get from using Redux.

We've covered Redux a lot in previous tech presentations, so we won't cover Redux basics here, but several of our next design best practices are in regards to specifics within Redux.  Read up on Redux with their official docs if you need a refresher.

Use Action Creators in Redux

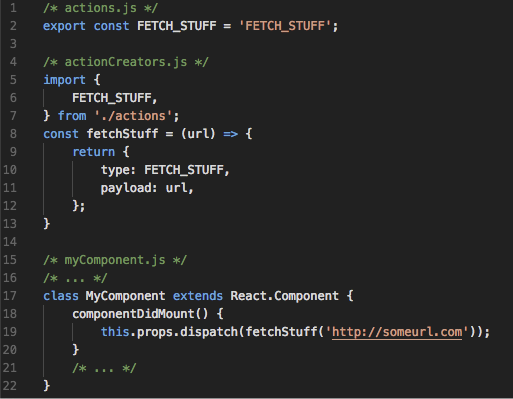
Using actions in redux, you are dispatching an object that has a type which is the action and a payload that goes with the action.  Here is a simple example without an action creator:

The payload is very specific to the type of action, yet what you dispatch is this rather informal data structure.  This makes it tough to track down what exactly the payload should be for a particular type of action.

If you use the Action Creator pattern, you turn that action into a function that has a name, you can import, and you can make the parameters it takes into formally defined data structures using JSDoc or Typescript.  Really makes them easy to use across the code base.

In general, we try to minimize the amount of searching a developer has to do in order to use something.  Action Creators help with this.

Use immutable data changes within your Redux reducers

Use only immutable data changes within your reducers to unlock the performance of your web app.  Being immutable means that you never change data in place, you always create a copy of it.  So you are never changing the data itself, you are only creating a new copy of it with new changes.

This means you can use PureComponent vs. Component as mentioned in one of the upcoming design best practices, because within your data store, you are always changing the top level object reference instead of individual properties.  This results in a Component being notified of a change in the most performant way possible, with the highest level object reference changes, which is a very fast thing for a Javascript engine to do.

We don’t use ImmutableJS often, but probably should use it more often for the data structures inside the Redux store.  We just design our reducers to be immutable by convention, which isn’t great.  ImmutableJS would force us to have immutable data structures and prevent data management mistakes.

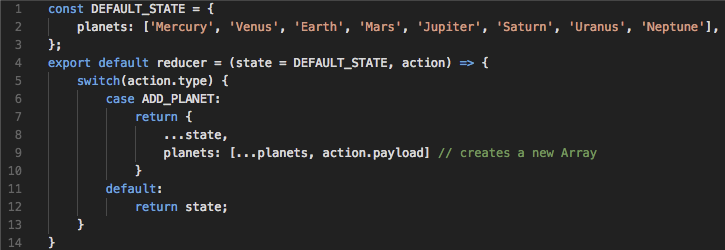
One very common place where you can easily be mutating data instead of treating it immutable is when you have an array in your redux state.

Changing data by mutating data in place (bad):

Changing data by creating a copy, keeping the data immutable (good):

Will your app work even if you change data in place?  Probably.  Could it perform better if it treated all data as immutable?  Almost always.

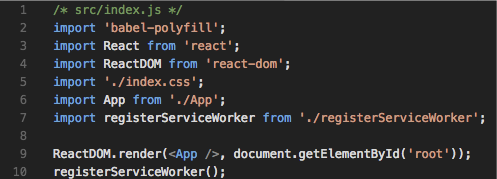
Use Babel-Polyfill

Using ES6 features can cause problems in Firefox and Internet Explorer.  Specifically Array.from, other Array methods, and some Map methods

We choose to take the code size hit (50-60kb) and not limit our usage of ES6 features

Babel version can only be changed if we eject create-react-app, we would rather not do that.

$  yarn add babel-polyfill

If you are already ejected from create-react-app, or didn't use create-react-app to start and have access to the babel compile process, I'd just change the babel target.

Error Handling

Transform common non-descriptive errors into more useful ones.

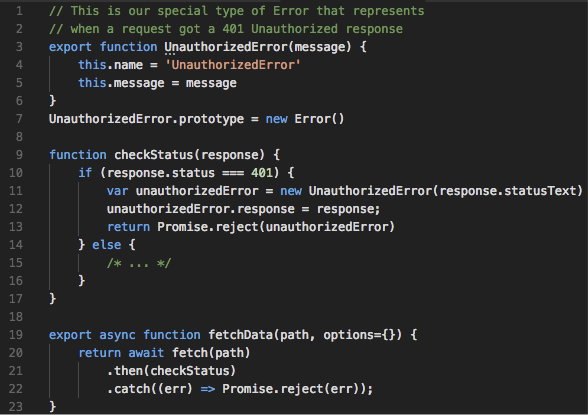
We transform common Errors into more descriptive errors (similar to the way Python does Exceptions). For example, when we receive a 401 Unauthorized response from the backend we will transform it into a custom UnauthorizedError and re-throw it. This is an instance of the UnauthorizedError class that we have defined as inheriting from the Error class.

This makes code that is dependent on Error type easier to read and abstracts the logic to a central location.

Send unhandled errors automatically to a bug monitoring service

We use Sentry as our favorite service to send errors in our frontend app.

The point is to find out about errors, face the reality of your app, not ignore them because front-end JS errors aren’t easy to track like back-end errors are.  Add in something that can relay errors that your users have to a service that tracks them, and you get notified when they happen, and you build reviewing the errors into your application support model

Sentry is great, we use it and configured properly, can also send your redux state along with it.

raven-js is the official Sentry package that is required to get up and going with Sentry.

raven-for-redux is the redux integration package we prefer. It sends the redux state and recent redux action history to Sentry. It also provides an easy way to include user information with each error (although this should be in the redux state already).

Version Checking

Problem:

What if your users are still using an old version of your SPA because they haven’t refreshed in a week?

How do they get your newest code?

You want bug fixes in their hands as soon as possible, but there is nothing automatically done for you.  You need to take care of this yourself.  In a React app, there is nothing that forces the user to reload the browser, which would reload the index.html, which would bring in your new JS and CSS code.

Solution:

Track the running and released version of your React code.

When you detect that they differ, it means you prompt the user to refresh the app or you force a reload that will force index.html to be re-fetched and bring in new code.

We put the released version in the public/manifest.json file, part of every create-react-app project.

Within our app, the first time it loads up, we fetch the manifest file and save that version as our running version.

Throughout our app's lifecycle, we check that manifest file and compare it's version to the running version.  You need to be careful that manifest file doesn't return a cached version, so we usually append some garbage to the end of the URL, like a timestamp /manifest.json?t=382323823

Component Choices

Function vs. Class

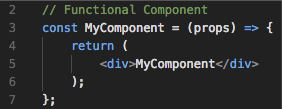
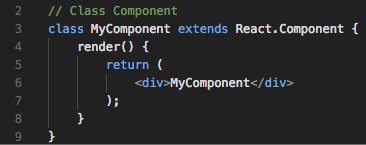
Choose functions when possible, in general always choose the most simple solution to a problem.

Pros - simpler, easier to understand, more memory efficient, easier to test

Cons - Lack lifecycle methods and state

Functional component:

Equivalent Class component:

Dumb vs. Smart

Dumb/presentational components present stuff, generally should be pure components.  Pure meaning that there are only inputs and outputs, no side effects.  The word "pure" is used because it mirrors the same word used in "pure functions", which refers to a function that only has arguments (inputs) and a return value (output) but no other side effects, defined only from it's inputs and outputs.

Notice how this Dumb component, which you click the button, it just passes the event out.  It does not store the data, just passes the data up to it's caller:

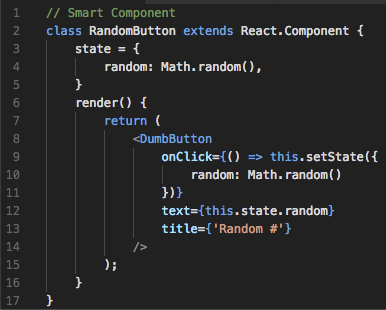
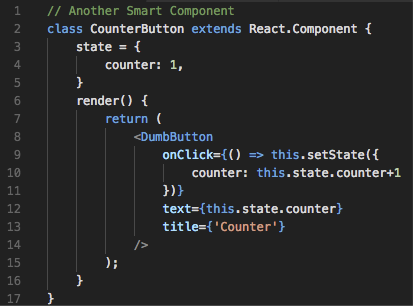
Smart/container components manipulate/provide data to other components

When possible decouple data handling from the markup by putting the data handling in a smart component, put the markup in a dumb components 

Allows reusing dumb components with multiple smart components

Here are a couple smart components that use that same dumb component

PureComponent vs. Component

Use React.PureComponent when possible

Only re-renders when data has changed at the highest level.

Works great with immutable data

Improves performance, prevents unnecessary re-renders

Easy to add - one line modified

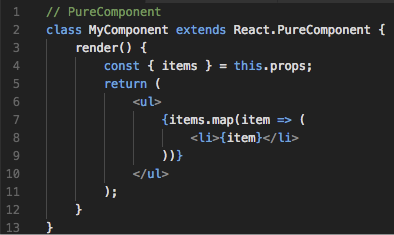
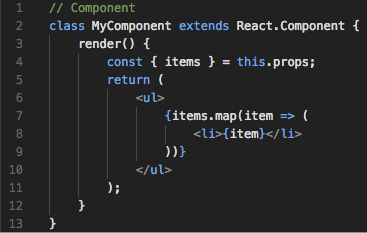
Here is a React.PureComponent and a React.Component in code.

React.PureComponent:

React.Component:

Only line 2 changed

The big change happens in shouldComponentUpdate(), which in a React.Component returns True by default.  PureComponent overrides this with a shallow compare so it will only detect when the top level object reference is different, which is what happens when we use immutable data in our store.

Side Effects - Thunks vs. Sagas vs. Epics

Side effects are most commonly async API calls that, when finished, will update  

Thunks, while simple, do not give the flexibility that we need in most large applications.

Sagas give greater flexibility, like only taking actions when you want to, while not deviating from the familiar redux logic flow.

Epics introduce streams which are, in our opinion, not as straight forward and don’t have any significant benefits over Sagas, so in most cases we just use Sagas.

The main point is to have a flexible, easy to use way of managing side effects within your React + Redux application, and we like Sagas or Epics over Thunks.

Routers

History

React Router was the first goto routing solution. With the introduction of Redux, having separate application and routing state, react-router-redux was written to live alongside react-router.  This introduced the concept of multiple sources of props, all of a sudden you had your props and ownProps when you had query parameters.  So instead of having redux manage all state, you had state split between redux and within the URL.  This always seemed a little clunky to work with.

Redux Little Router was a project we really liked how they understood the problem and went about solving it in a way we expected.  Redux Little Router basically took the React Router philosophy but moved its routing state into Redux’ application state.

Then, another evolution of the same concept, Redux-First Router takes it another step by removing components whose sole purpose is routing (<Route /> and <Fragment />). Removing the more imperative elements of React Router and Redux Little Router.

React Router

We have used this in past projects (even with Redux) and it is the obvious choice for applications not using Redux because it has great support and lots of users.

Redux Little Router

We feel this is a good alternative to React Router if Redux-First Router didn’t exist but seems to not want to stray too far from the familiar React Router territory.  It did a lot for inspiring the future of routers.

Redux-First Router

This is our go-to on all projects where we are using Redux. It fits seamlessly into our Redux store and offers many possibilities for triggering side effects based on specific route changes.

Instead of a single action type for any route change, every route change has a different action.

In the case of error reporting, because of a different action per route, we also have a consistent history of a user’s interactions for use in trying to reproduce user errors.

We also then turn routing into using an action creator, so we can do stuff like goHome(), or goVideoDetail(video_id)

Testing

No opinion on which libraries to use, we’ve used a lot over the years

Create-react-app comes with Jest, so we tend to use that in React projects

Most of our design opinions regarding tests come down to what amount of testing is right for a particular project.  Being ideal, 100% is always the target, but that’s almost never practical or realistic.

There are diminishing returns with tests, prioritize which tests to complete first

Priorities

  • Test complex code that is prone to bugs or missed corner cases with future modifications

  • Test commonly accessed code, like on most interactions.

  • Write tests that give a lot of code coverage with little test code or work.

  • If you encounter a bug that could have been prevented with a test, that’s a good excuse to write one.

Documentation in Code

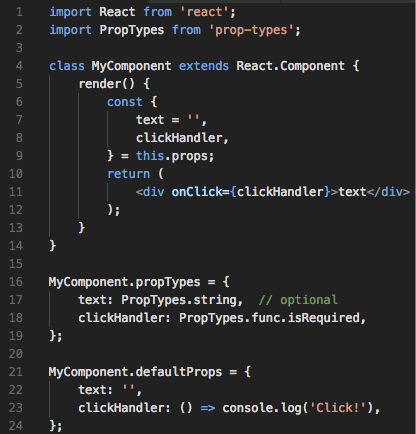
React PropTypes

Try to always use them

Helps developers prevent logic errors that may otherwise be difficult to trace.

Provides a way to document what parameters a function/class accepts using standardized code that’s easy to understand.

React defaultProps

A more explicit way of setting defaults in a standard way.

When using PropTypes, defaultProps provide a way to set defaults for parameters. The conventional method of setting the defaults in the function definition will not pass the default values through PropTypes. defaultProps sets the defaults prior to passing the parameters through PropTypes validation.

Typescript

Makes sense on projects that reach a bigger scale with code size, number of devs, complexity, or life span, but in our opinion overkill on most smaller projects.

This is another feature that we look at the technical capability of the client team we would be handing it to and factor that in.

On bigger projects, it’s really amazing for creating self-documenting code and allows developers to easily use new code they haven’t seen before.

Searching for missing @types from DefinitelyTyped files can still be a pain because it’s not guaranteed that there will be types for a particular library.

Our friend “any” has come to the rescue many times.

JSDoc

Projects that don’t use Typescript, it’s important to comment properly.  VS Code picks up JSDoc pretty well, so we use that to do typedefs and still have some pretty good autocomplete within the editor.

This is the most common standard for documenting JS code, so we use it as much as possible when writing comments.

Wrap-up

If you read this whole article, you are clearly a great human being. Connect with me, Jeremy Zerr, on LinkedIn and let me and my team help you build great software!


ANGULAR VS. REACT - FRAMEWORK DEATHMATCH

2017-09-06

Tabs vs. Spaces. Vi vs. Emacs. Angular vs. React.

All arguments we have when among friends (the nerdy ones).  We will be covering modern Angular 4 vs. React, framework battle to the death.

As a part of my consulting work, we have gotten a chance to build with both frameworks on various types of projects, and would like to share our view of both.  We will compare two identical web apps coded with each to show real, working code comparisons.  We will show how to use each with redux, webpack, command line tools, debugging, routing, TypeScript, to show you what is possible with each.  We will also classify which types of apps/products may fit better with one or the other to help with any upcoming projects.

I gave this presentation to the Boise Frontend Developers meetup, here is a PDF of the slides.


STATE OF ANGULAR PRESENTATION

2016-06-03

This past week, Andrew Chumich and I gave a presentation on the State of Angular at the Boise Frontend Development meetup.  Covers our observations from ng-conf 2016 and some of the exciting features we learned about, and new projects in the Angular ecosystem that are going to be significant.

Some of our favorite new Angular 2 features are:

  • ability to control the View Encapsulation of a component, allowing you to use Shadow DOM to encapsulate styles, or use the default emulated mode to accomplish the same without Shadow DOM by compiling your styles/template differently

  • RxJS brings full-featured Observables into Angular 2, which is an alternative to using Promises and will enable optimized change detection for components

A couple of our favorite new projects in the Angular 2 ecosystem are:

  • NativeScript - using the same general techniques as React Native to have the possibility of creating hybrid mobile apps using Javascript but using Native UI components

  • Angular CLI - a command line interface for Angular 2 to launch new projects and add parts

Here is a link to our State of Angular presentation


BOISE CODE CAMP 2016 PRESENTATIONS

2016-03-19

This year at Boise Code Camp I am presenting on a couple different topics.

One is on AngularJS Fundamentals, get the slides.

I discuss the fundamentals of creating web applications with AngularJS 1.x, covering topics of modeling your data, creating templates, designing directives, all work included Plunker code samples for you to run and try out.  Also includes strengths and weaknesses of Angular, comparisons to React and Angular 2, and what kind of software you can build with Angular.  Here is a link to this presentation on the Boise Code Camp Lanyrd site.

My second talk is Adventures of a Freelance Software Developer, get the slides here with no presenter notes, and here with presenter notes.

If you have aspirations of being a freelance software developer, come learn from my experiences of running my own freelance business over the last 7 years. I will share things that worked, things that didn't, what tools I use, how to market yourself, how to pick technologies to focus on, how to manage projects, and many other things that most don't think of when jumping into the freelance lifestyle.  Here is a link to the presentation on the Boise Code Camp Lanyrd site.

Hope to see you all at the awesome event!


ADDITION TO ANGULARJS COMPONENT REFACTORING PRESENTATION

2016-03-13

After creating my initial AngularJS Component Refactoring presentation, which explained how to refactor your Angular 1.x apps to use component-based design, there were some new developments in Angular that fit nicely as a next step. Angular 1.5 was released, which added a component function that is basically a more simple form of a directive like we refactored to in the presentation.

Angular 1.5 adds a logical next step for us to get to a component based design, and even closer to making an upgrade to Angular 2 much easier.  Angular 1.5 also adds a one way databinding type, but it doesn't work exactly like I hoped, I covered that in the updated presentation, too.

I updated my slides that I used during the presentation at the March Boise Frontend Developers Meetup.


ANGULARJS 1.X COMPONENT-BASED DESIGN

2016-02-03

With all the talk about Components being the future of the web, and frameworks like React and Angular 2 using them so prominently, why do we have to wait? Why can't we start refactoring our Angular 1.x apps right now to use the new design practices in these up an coming frameworks? Well, we can take some baby steps towards refactoring our Angular 1.x apps to take advantage of a Component-like design.

I gave a presentation about this topic at the Boise Frontend Development meetup in February.  You can get the slides here.

The presentation has links to three separate code demos, all hosted on Plunker.


REACT + REDUX DESIGN LESSONS PRESENTATION AT BOISE FRONTEND DEVELOPMENT MEETUP

2016-01-07

To gain more experience building with React + Redux, we are building a time tracking web app based on the TSheets API and sharing our experiences with our developer community here in Boise.

We have built other TSheets API apps in AngularJS as a part of paid client work that we do at Zerrtech, which is Andrew Chumich and I, Jeremy Zerr.  Given that experience, building something similar to a previous project in another framework is be a great way for us to compare AngularJS to React + Redux.

Ultimately, we hope to understand those critical differences and similarities between the frameworks and approaches to designing web applications.  It will make us better advisors and more well-rounded front end developers.  Every framework we work with, and every project we complete, helps us reach these goals.

We decided that it could be beneficial to others if we shared this process with our fellow colleagues in the community.  We presented a few design lessons we learned at the Boise Frontend Development Meetup.  We hope to follow up soon with more lessons learned.  All of the source code is released on Github.  Here are the links to the materials from the presentation:

React + Redux Design Lessons Learned

PDF Slides

Github repository react-redux-tsheets-app

If you have any challenging projects that you need some contract help on, and like to work with people who are passionate about what they do, we would love to hear from you, reach out to me on LinkedIn.


WEB APPS THAT WORK OFFLINE AND SYNC USING REACT, REDUX, AND POUCHDB

2015-04-05

I gave a presentation at the Boise Frontend Developers meetup this evening about web apps that work offline and sync using React, Redux, and PouchDB.

Here is a brief description:

We design our web apps and mobile apps differently.  We almost always need to design mobile apps to work offline.  Yet, we rarely think of our web apps working offline.  This leads to multiple code bases that handle state differently and work differently for users.  Adding offline capability to a web app becomes a gigantic effort and not feasible.  The sync process between multiple devices on multiple platforms is not easy either.  I propose a straightforward open source solution with React + Redux using PouchDB/CouchDB.  Full sample code and ready to use off the shelf libraries will be demonstrated.

Here are the slides for the presentation.

A link to the Github repo at jrzerr/react-redux-pouchdb


ANGULARJS PROMISES PRESENTATION AND DEMO CODE

2015-02-04

I made a promise to present about AngularJS promises to our Boise AngularJS Meetup, and I resolved that promise. (sorry for the bad attempt at programmer humor)

Here is a link to the presentation slides as a PDF.

Included in the presentation were three separate Plunkers showing different variations of implementing an Image Preloader to show how to use several features of AngularJS promises.


MUST-HAVE FEATURES FOR YOUR CLIENT API LIBRARY

2015-01-03

The hard part is done.  You built an API for both you and your customers to use.  You have started to see some great partnerships from customers and other companies who are using it.  Now you want to get the word out about how your API can help people run their businesses more efficiently and help them make more money.  Is marketing the answer?  It’s a piece of it, but is also comes down to how easy is it for developers to integrate with your API. The answer: Your client API libraries. Designing a client API library for several programming languages can be a great opportunity to encourage developers to use your API.  Since your API is part of your product, and your product makes you money, I see a well designed client API library as a money maker.  It can allow you to keep current customers happy and find new customers in business sectors that might surprise you.  Yet, this is a largely under-appreciated aspect of many businesses that provide APIs. As a part of my startup Affiliate Linkr, I currently integrate with APIs from 5 different affiliate networks, and none of them have a client API library.  That’s right, none of them!  Talk about a missed opportunity!  I wonder how many cool apps could be developed if only they would make it easier for a developer to pull some code off of Github and start innovating. With my experience developing Affiliate Linkr and several other projects, I’ve had a chance to use client API libraries and create some of my own, so I wanted to share my opinions so we can all do a better job creating them. If you are excited about creating a client API library for your API, but would like some help, please contact me on LinkedIn and let’s work together! Here is a list of 13 must-have features when designing your client API library.

  1. Object Oriented Interface

  2. Throw Named Exceptions

  3. Allow Automatic Retries

  4. Should Handle Multiple API Versions Within One Code Base

  5. Base API URL Can Be Changed

  6. Unit Tested and Functionally Tested

  7. Use an Existing Library for Doing HTTP Communication

  8. Ability to Get Raw API Responses and API URL Calls for Debug

  9. Example Code

  10. Live Demo of Example Code

  11. Library Should be Installable Using a Package Manager

  12. Make Releases

  13. Quality Documentation

For a detailed look at each of the must-have features listed above, please read on. Object Oriented Interface One of the main reasons you are creating a client API library in the first place is to give people an easier way to work with your API.  You want to make it easy for people to create apps using your API, so you gain new customers or make your existing ones even more satisfied.  An object oriented interface to your API allows you to fit into the most designs, as almost all developers are familiar with OO and most likely their end application can easily integrate object oriented code. One important detail when designing your object oriented interface is the naming of your classes, class accessor functions and other methods.  Your class names should correspond to the different service endpoints.  Like if you have a /users/:uid endpoint, you should have a UsersService that returns the user data as a User object.  If one of the resources you can access for a user is projects by an endpoint like /users/:uid/projects, you should have a User method of getProjects() that corresponds to this endpoint.  Internally, that function could use the ProjectsService class to fetch the data. As with any class, module, or library, make sure you use a namespace so that you do not run into any conflicts with other libraries or existing code. Great naming can help give your API users intuition about how to use your API without knowing all the little details.  It is also important to document how this naming will be done.  Let’s say that you have an endpoint of /users/:uid/equipment-owned, how would that look?  I suggest having a clear naming conversion guide, something that states for example:

  • dashes and underscores are removed and considered as word separators

  • camel case will be used (capital letters used for the beginning of words)

  • get and set will be used for accessors

A naming convention like this would result in the OO method being User->getEquipmentOwned() for the /users/:uid/equipment-owned endpoint.  Having a clear naming policy makes your job easier, and also helps future developers implement changes to the client API library easier when the API changes.  The specifics don’t have to match what I have said above, but having a clear naming convention is where the value is at. Throw Named Exceptions Your client API library should throw named exceptions for as many error cases as you can.  The names of the Exception classes should be self-descriptive, so inspecting an object in the debugger will allow you to have an idea of what is going on. Your exceptions will break down into a few groups:

  • Authentication related

  • Authorization related

  • Request related

  • Response related

Make sure to cover them all.  They are especially important when a developer just starts to learn to use the library, where onboarding someone smoothly to your client API library can really improve how that developer feels about your company.  Yeah, I think of a client API library as a recruiting tool. An example of this would be if the user sets an invalid API key, the API might respond with a HTTP status code or an error data structure.  You would present the user with this within your client API library as an exception thrown that would be descriptive and identify the error uniquely, like InvalidAPIKeyException. Having named exceptions are also very important to allow multiple catch blocks to look for specific exceptions by name, so the user of the client API library can integrate error handling into their application.  Maybe some Exceptions thrown are fatal to the application, but other Exceptions just require a retry of a request.   Having errors that can be recovered by just retrying a request is something that happens to me with a couple of the APIs that I use within Affiliate Linkr.  The API errors are random, really have no reason for them, and the same request will return fine with a retry, so knowing what particular error I got can be the difference between a fatal app failure and a smoothly running app. Allow Automatic Retries Not every API is perfect.  There could be situations where the API gives a bad response, or is too busy and cannot service a request.  Some of the reasons may be out of your control too, like a spotty internet connection that maybe broke down along the way.  Having a backup plan for these cases is smart. I suggest to build in a way for the user of your client API library to enable automatic retries.  The reason I like it as an option for the user to enable is that maybe the user’s application has a different way they want to handle it.  Maybe they want to treat it as a fatal error, and possibly put some analytics on it so they can feed back to the API support team. I feel like adding automatic retries might be better handled in your user’s application in most cases, so whether you choose to have automatic retries as a feature might depend on what your API functionality is.  Some APIs might be more prone to errors, or high traffic, where an uncaught error might be common and the consequences could be pretty bad. The essential factors in a retry system is to allow configuration for:

  • Retries Enabled

  • Number of retries

  • Time between retries

  • Named Exceptions that will allow retries

  • Named Exception thrown when all retries fail

Depending on how much control you want as the designer of the client API library, you may want the Exceptions that will allow retries to be controlled by you and not exposed to the user.  However, I think that the goal of being developer-friendly should result in us exposing that as a setting, but providing a solid set of defaults so that it likely never has to be changed. Having a different Named Exception thrown when all retries fail is important so that the application can operate with both retries enabled and disabled, but use the same code.  They could handle the non-retried Exception one way, maybe with manual retries, but the retry failed Exception might cause a fatal app error. Should Handle Multiple API Versions Within One Code Base When a new API version is released and some of the changes are not backward-compatible, developers using your client API library should not have their applications break.  Forgive me for stating the obvious. I also feel that as a developer using the client API library, my existing code that uses the library should not break if I update to the latest library release.  This means that if I want to keep using my current version of the API, updating to the latest library release should not automatically cause my code to start using the newest API release.  I should always have a way to make my existing code continue to work. To enable this, the client API library should have a setting as to what version of the library to use.  I don’t suggest that you make people define a number, like setVersion($newVersion), too much chance for error.  It is better to have a specifically named version method, or at the very least, a constant.  So setVersion3() or setVersion(API_VERSION_3).  If you allow setting it via setVersion(), just make sure you make sure it is a valid API version number and throw an exception if it isn’t. Also, I suggest defaulting the client library to the use the current version of the API, but only using something similar to a constant API_LATEST that you can default to, and possibly a setVersionLatest() method.  Require this line to be in code!  This makes the developer make a specific decision to be working with the latest API version the library supports.  So then when they update to a newer release of your client API library, it will automatically point to the latest API version, and use any new code associated with it, and possibly cause breaking changes to their app but it was their explicit choice.  The key is that it is obvious that they are choosing to live on the edge by having an intentional choice they have to make. To allow different API versions to be handled by the same code base, I like to design using Data Mappers to map between the API response and the client API library classes.  Data Mappers help with decoupling, because they are the only class that needs to know both about the API response data, and the client API library object.  As an example, I’d use a UserResponseMapper to map a UserResponse object into a User object. Different class names for your service objects that correspond to different versions are the way to go, but a smart idea would be to inherit from a base service name.  The service probably doesn’t change a ton over time, but just small changes, so it’s likely that a base service class could have most of the logic you need. An example of this would be if you are currently on version 1, but you come out with version 2, then your user class name for the latest version of the library would be User, but your old user class could be named UserVersion1.  Always keep the version number out of the class names of your current code, that allows you to potentially remove legacy code someday.  While the class names returned might be different than they were before, the interface is the same.  To handle this gracefully, it is useful to have a factory method to return an object that corresponds to your current API version to avoid having class names hardcoded. Base API URL Can Be Changed To allow for development work and testing, having the base API URL be a setting of the client API library will enable this to be easy. This is also a key for unit testing.  You may want your live HTTP testing to go to a test-only URL that has some fake data in it. Note that this base API URL should NOT include a version number in the path.  Most likely, the API version will be included in the URL, but the API version can contain any number of significant changes both in the API and the client library operation.  We are setting the API version separately also, as mentioned previously.  We will use the base API URL in combination with the library version plus the service endpoint to craft the full URL. Normally, this base API URL would default to your production URL, but since being able to override the URL is a feature that you will want anyways to allow future development and testing of your client API library, it’s a no-brainer that it needs to be a feature. Unit Tested and Functionally Tested Like any piece of code, a client API library should have tests on several different levels, both unit and functional.  This can get a bit tricky since the client API library is meant to interact with the live API over HTTP.  Yet, it is important to have some tests for your client API library without needing the live API.  This is why I see a couple different levels to testing a client API library. The first level is without any live API available.  The strategy with this is to mock the HTTP responses that the API is supposed to return, which then allows us to test all of our code independent of the API being available.  What this will look like is that we will have a bunch of files that contain sample XML or JSON data that is exactly like what is returned from the real API call, then we process it as though it was real. The second level is with a live API available.  This part can be hard as you need some real user credentials.  You could consider having a dummy user that has some fake data within your live API.  One alternative is like Amazon Web Services PHP SDK, they just have a place within their client library that you can put your actual credentials in a file.  If your actual credentials are defined, then it enables running through the live API tests.  I really like that technique, because it avoids having to always maintain a dummy user account. I would advise verifying the raw data back from the API as it’s own suite of tests, then also test the whole system together that is raw API data all the way through your client API library and converted into usable objects. For completeness, you should also test for proper exceptions thrown when you pass in invalid API keys or client key/secret during authentication. I think it goes without saying that we all know what we should test, but that ends up being a TON of work.  It’s easy for me to say in a blog post that you should test all this stuff, but of course it depends on your project and factors such as longevity, how many users you will have, and number of different environments the client API library could be used in. Compare a Javascript client library to a PHP client library.  A Javascript library can be used from a node.js app, a web app using jQuery or other frameworks like AngularJS and Backbone.js, or a Google Chrome app, a mobile app, etc.  A PHP library really has a much more narrow focus, will be used from PHP code and possibly from within frameworks like Symfony or Zend Framework.  The end system is a lot more well known and predictable for PHP when compared to a Javascript library. Use an Existing Library for Doing HTTP Communication When writing a PHP client API library, I highly recommend using Guzzle.  Using that makes it very easy to mock HTTP responses, and knows how to talk OAuth to make communicating with any API require a lot less code.  Always strive for less code. Other languages might not have a frontrunner in the area of HTTP communication libraries, if not, no big deal.  You will just need to implement the HTTP mocking yourself through smart design, and handle your specific HTTP authentication method, which for some APIs is probably not too hard at all. Ability to Get Raw API Responses and API URL Calls for Debug When I develop a client API library, as with other software, unpredictable things can go wrong.  When things go wrong, I start debugging and look to verify what is happening at the most basic level, which is the HTTP request and response.  If the client API library does not allow a developer visibility into this low level of HTTP requests and responses, it makes it so hard to tell what is happening. The client API library should make it easy to get out raw API responses and API URL calls along with headers and body to help provide this low level debug capability. Another reason to provide these raw HTTP request and response details is when dealing with support requests to the API provider.  When communicating with customer support, they always ask for the HTTP request and HTTP response, they don’t want to deal with your code and they shouldn’t have to.  If you give them the HTTP request headers, URL, and body, then they can re-create the request and see if what they see matches what you are seeing in the raw HTTP response. This is not only for problems caused by your client API library.  No API is perfect, there is always the possibility for real errors in data to be caught by users of the client API library.  Our job as creators of that library is to enable the developers using it to identify these problems and easily have the information at their fingertips to debug it. Example Code ALWAYS include example code that uses your own client API library.  This should be included within your code base, and have instructions how to run it.  You should try and include examples from as many end environments as you can.  As an example, Javascript can be run in a lot of different environments, so you might need to consider example code for node.js, a web browser, and a Chrome app. This example code can really inspire someone to create a cool app with the API.  Also, when things go wrong, the first thing I look for in a client API library is some code that I know that works, then see what I am doing differently. I also recommend having a simple example, and some more advanced examples.  The more examples you can provide, the better off your users will be.  Look at what you are testing within your unit and functional tests for ideas on what kind of examples to create. Live Demo of Example Code We want to ship our example code with our client API code base, but it also is so nice when we can create live working examples of our client API library in the form of an application of some sort. For a PHP or Javascript library, the goal would be to have a web page that developers could visit to test out the API using your client API library.  It would have a way to enter credentials to authenticate, then have form inputs to define the request parameters, and return the data from the API. This is not only for seeing how your client API library works, but also is a great tool for testing out API calls.  You could include this sample web app in the client API library repository, but a better idea is to include it in a separate repository that you make sure to link to within your client API library documentation.  The reason to have it separate is that it should also be easy for someone else to spin it up and use.  The sample app would have a dependency on your own client API library, and if you are using a package manager, it’s a great way to show how that integration works too. Library Should be Installable Using a Package Manager For modern software development, it is a great idea and expected to have your library installable through the package manager for the language you use.  Like Bower or NPM for Javascript, composer for PHP, gem for Ruby, etc. There are a lot of other aspects of your library that this implies, such as maintaining releases and versioning of your API to be compatible with the package manager.  You will probably have some extra config files that are a part of your repository. Make Releases Using a package manager will dictate most of this process for you, but define your release procedure and naming convention, don’t just make everybody pull trunk. If I look at a new project and see no releases, I automatically think less of the project, consider it to be in a beta state, and will start to look for alternatives.  So make releases so you give your users confidence in using your library. This also helps when it comes to customer support.  Knowing clearly what release a customer is using will make it a lot easier to reproduce any errors. Quality Documentation We all know that documentation is important, but quality is preferred over quantity.  Great documentation is made when you step away and can put yourself into the shoes of your users.  What questions are they going to ask?  What is going to be hardest for them to do?  Do you have any uncommon features? We should include the obvious instructions on how to install both with the package manager and manually. We should have special instructions on how to test it, how to get at the example code, and where the demo pages are located at. I highly suggest using Github for your repository so that you get Issues and a Wiki with your project.  You can put the most basic documentation in your README.md and more details about architecture, types of named exceptions, API version handling, and everything else in the Wiki. Optional Features (not exactly must-haves but are a good idea):

  • Continuous integration capable through online sources like Travis CI directly integrated into your Github README page.  It can give a great deal of confidence, but as long as you have clear instructions for a developer to run tests, this is just icing on the cake.

  • Providing your source via CDN (for a Javascript library).  Nice as it just takes one line to bring into an app, but for most bigger projects integrating via package manager is used more often.

Summary There are a lot of under-appreciated features that go into a useful client API library, but it has to be designed with as much care and attention to detail as the API itself if you want it to be a business driver for your company. If you are excited about creating a client API library for your API, but would like some help designing a client API library using these principles, please contact me on LinkedIn and let’s work together!


USING ANGULARJS UI-ROUTER QUERY PARAMETERS AND COMPLEX DIRECTIVES TOGETHER WITHOUT KILLING APP PERFORMANCE

2014-12-03

This is a presentation that I gave at the Boise AngularJS meetup.  The Plunker that goes along with this can be followed along with here.

The Problem You have an application where you want to allow the user to pan an image.  This is a large image which you cannot display on the screen at one time.  In this example, I'm using the AngularJS shield logo, but a more pertinent example might be a geo-mapping application, or a data visualization application.  In an application like this, you may prefetch more data than is actually shown on the screen to be rendered quicker as the user performs a few fairly predictable actions (like moving it around).  Think of an application like Google Maps.  If you are looking at your city, you most likely are going to drag it around a little bit, because you might be travelling.  You might pre-fetch neighboring map images so that the drag feature would be able to be fast since you can almost predict it happening. The other requirement is that the location within the image that the user pans to must be captured in the URL to allow permalinking to a particular view.  We want the user to be able to just copy and paste, or socially share, the URL in the address bar with friends.  This is also a lot like Google Maps, you can find your favorite barcade and email it to your buddies by clicking a share button or copy and pasting the URL. With that requirement, your URLs will then look something like: /image?x=50&y=100 Where x and y represent the offsets into the image.  With a map, these would probably be latitude and longitude. You initially implement this within ui-router as a single state with query args, like:

.config(function config($stateProvider) { $stateProvider.state('single', { url: '/single?x&y', controller: 'SingleCtrl', templateUrl: 'single.html' }) })

See the Plunker in the single.js file for this code.  Then in the Angular way, you decide to encapsulate the image loading and panning in a directive within single.html.  Like this:

<canvas my-image image="imageurl" x="navigation.x" y="navigation.y" width="400" height="400"></canvas>

You design your directive to be attached to a canvas element as an attribute, with directive attributes for the x and y position. Within the directive, you then load the image into memory which requires a fetch from the server, then write it to the canvas element within this directive. When you start panning around, you notice that it is not very responsive.  There is a delay every time you switch the x and y coordinate.  You can see this within the Plunker when looking at the Single tab.  Use the Pan buttons to move the image around.  (For this exercise, I've added in a 500ms delay to simulate a delay in processing in a complex directive). This is due to the fact that with ui-router, every time a query arg is changed, it is a state change, the controller is executed again, and the template is re-rendered. The Solution Follow the pattern of splitting your states with query arguments into two states, one for the "base" state, and a sub-state that handles the query arguments. Your URLs will then look something like /image/view?x=50&y=100 as opposed to /image?x=50&y=100 The "base" state url is /image and the child state for the query parameters are /view?x&y.  Like:

.config(function config($stateProvider) { $stateProvider.state('double', { abstract: true, url: '/double', controller: 'DoubleCtrl', templateUrl: 'double.html' }); $stateProvider.state('double.view', { url: '/view?x&y', controller: 'DoubleViewCtrl', template: '<div></div>' }); })

You can see this in the Plunker in the double.js file.  Note: You cannot just have a child state of ?x&y, it does not work, must have a pattern to match on before the ?. This allows the "base" state controller and template (which contains the directive) to stay as an active state and not be re-executed and re-rendered when just the URL query parameters change. The fundamental difference between this two state and the single state example is that the query parameter handling code is pushed down into the child state, and changes the x and y inherited from the base state's scope, thus causing the directive to change.  Notice in the Plunker how the logic that was in the SingleCtrl is now split between DoubleCtrl and DoubleViewCtrl.  This actually leads to a very nice natural split in the functionality of the code, feels like better design.  All the query parameter handling logic to map back to an inherited parent navigation object that contains those same query parameters is in the DoubleViewCtrl which is the state with the query parameters in the URL.  Makes sense, right! This "base" state can also most correctly be declared as abstract: true which means it cannot be transitioned to directly. Now that the directive does not get re-created every time a query parameter changes.  It only changes the child state, not the base state.  This means you can just move the image around and copy to canvas very efficiently because it remains in memory.  Notice this by going onto the Double tab within the Plunker, you can see the execution count there, the parent state "double" controller and directive inside it's template only get called once.  Only the child state "double.view" controller gets executed with each click on the buttons.


ANGULARJS BACKEND-LESS DEVELOPMENT USING A $HTTPBACKEND MOCK

2014-07-05

I was only able to briefly mention that I used a $httpBackend mock to do backend-less development with AngularJS during my presentation on AngularJS Data Driven Directives, so I created an isolated example in a Plunker to fully implement it.  Here is a link to the Plunker if you want to skip right there, below is an explanation and the embedded plunker.

The purpose of this example code is to show how to do backend-less development with code that uses both $http and $resource to fully cover the most common server communication options within AngularJS. Why do backend-less development? Isolating your AngularJS frontend development from the backend (REST API) can allow potentially separate teams develop independently.  Agreeing on the REST API can then allow both teams develop in parallel, agreeing to implement/use the REST service the same way. This can be accomplished by the simple inclusion of a file in your AngularJS code that creates a mock using $httpBackend.  $httpBackend makes the requests that are underlying $http, which is also what ngResource $resource uses.  When you are ready to hit the real backend REST API, simple remove the file from being included, possibly as simple as a special task inside your grunt config. There are two different flavors of the $httpBackend mock, we want to use the one not for unit testing, but for E2E testing: AngularJS $httpBackend docs How do we do it? We use URL patterns within app-mockbackend.js to intercept the GET and POST calls to the URLs, along with the data for a POST.  We can use regular expressions as patterns, which allows for a lot of flexibility. The handling of the URLs and HTTP methods and returning "fake" data only works by having some data that can be persistent from request to request.  I store the data in an AngularJS service ServerDataModel that emulates storing the data a lot like the server would.  The AngularJS service recipe is perfect for this becuase it injects a constructed object, and that object contains our data.  No matter where it is injected, the instance of the object is what is shared so it contains the same data.  There is some data that is pre-loaded in that object that is analagous to having a database on the server that already has some records.

Here is the embedded version of the code, although I do think it is easier to view in its full glory directly on Plunker.


ANGULARJS DATA DRIVEN DIRECTIVES PRESENTATION

2014-07-02

Creating data visualization solutions in Javascript is challenging, but libraries like D3.js are starting to make it a whole lot easier. Combine D3.js with AngularJS and you can create some data driven directives that can be used easily within your web app.

I created a presentation for the Boise AngularJS Meetup to show how to design AngularJS directives that interact with D3.js.  Also, because there is no getting away from it, I also include some ideas on how to manage your data models and transform along the way to guarantee a logical separation from your domain data model and your chart data model.

The link to github for the code is: AngularJS Data Driven Directives

The code in that repository is up and running on my Github Pages site for this project with the demo located here: Basketball Scorebook demo page.

You can get at the slides here: AngularJS Data Driven Directives Presentation Slides


WHY YOU SHOULD USE ANGULARJS IN YOUR NEXT WEB APPLICATION

2014-01-10

Adding a new javascript framework like AngularJS to your web app requires some careful evaluation.  Most projects already are using jQuery, maybe jQuery UI, and potentially other javascript libraries to handle other functionality not covered by jQuery or even jQuery plugins for UI elements like charts, multi-selects, infinite scrollers, sliders, etc.  Any javascript framework has a tough task to find a space to fill with developers. Your decision might consider the additional lines of code added, worrying about if this may slow down your javascript execution, or page load times.  You know you will also have a huge initial learning phase where you discover how to use, then try to learn best practices as you start to play around with implementing your app.  Maybe you are concerned that it is just a fad framework too, there are other options for similar Javascript frameworks like Backbone.jsKnockout.js. For most, I bet the initial learning phase and temporary slowdown in development is the primary hurdle.  This can slow down a project that could be quickly done with existing technology.  The long term benefit has to be there in order to spend your time learning and figuring out best practices, and ultimately the new piece of technology must be solving a problem in your software architecture to justify the time. I found when researching AngularJS and going through the process of implementing an app with it, that it was going to be a great tool in making web applications.  For a big list of criteria I recommend to evaluate when considering adding a new component to your web application, check out my article here titled 18 Questions to Ask Before Adding New Tech to your Web App.  Here are some of the criteria from that list and how my evaluation of AngularJS went.  It's my opinion that there is a significant hole in front-end web development that AngularJS fills. 1. Address some problems in your software architecture When writing web applications, I have objects in the server-side code that often times aren’t represented as objects in the client-side code.  For simple apps, this might be OK, but when it gets complicated, it can be a big help to mirror these objects on both sides.  Also leads to a terminology issue, a Person object on the server can’t truly be talked about as a Person on the client side because it doesn’t look or feel the same way.  Doesn’t have the same methods, isn’t represented as code, sometimes is stuffed into hidden inputs or in data attributes. Managing this complexity can be very hard.  AngularJS has ng-resource which you use to create services that hook up to REST APIs and return back that object in JSON and you can attach methods to that object so it can be a fully functional object.  It feels more like something familiar to what you are working with on the server side.  All without much work on your end, you have methods like save(), get(), update(), that map to REST API endpoints and are most likely the similar methods you might have in your Data Mapper on the server side. AngularJS encourages you to also deal with models on the client side just like you have them on the server side, big plus there. I also don’t feel like the design using jQuery + Mustache is elegant when it comes to having an object that has properties represented in different ways within the web UI.  An example, you have a table of Person objects from the REST API, you have a button for each Person to denote they have “Accepted” an invitation, so when they click, you want the checkbox to change and you want the style on the row to change.  In jQuery, you listen for the checkbox change event, then you toggle the class on the button and the row.  In AngularJS, the model is the source of truth so you build everything from that. See what I mean by taking a look at this jQuery vs. AngularJS plunker I created and compare the type of code you write. 2. Enable you to create software more quickly and with less effort AngularJS having the ng-model and ng-class directives alone cover so many of the common operations that we all have been doing in jQuery.  Two-way data binding and saving to the server now takes a small number of lines in AngularJS, but in jQuery would require creating your own object, and several different click and event handlers.  Switching from watching elements and events to watching a model is a big shift in the right direction. 3. Result in software that is more maintainable AngularJS encourages using the model as the source of truth, which starts to get you to also think object oriented design on the client-side.  This allows you to keep in mind the same object-oriented design principles that in general make software more maintainable compared to procedural. 4. Improve the testability of your software AngularJS has dependency injection at its core, which makes it easy to test.  Even the documentation on the AngularJS site has testing as a part of every tutorial step, which almost makes it hard NOT to test. 5. Encourage good programming practices Model as the source of truth, dependency injection, ability to create directives that can decorate elements that lends to reusable and shareable components, REST API connection to your server, lots of benefits from just following AngularJS basic usage. 6. Allow you to collaborate more easily with other people Using models as the source of truth is something that is familiar with anybody who is doing object-oriented MVC server-side software, so this should make it easy to pick up for most web developers. Also, being able to create directives in AngularJS and dependency injection makes it easy to create components that can be shared easily between developers and really has excited the developer community.  Lots of existing projects have developed AngularJS directive bridge libraries so you can use their code by tossing an AngularJS directive to decorate an existing element with new functionality.  Like Select2Infinite ScrollerBootstrap, and Angular has its own UI companion suite.  Just check out http://ngmodules.org/. 7. Allow you to become proficient in a reasonable time It took me around 2 full weeks to feel like I was proficient, where I was starting to pick out and understand best practices and look at some of the finer points of the framework.  Where I started from is that I have a lot of experience developing with Javascript, jQuery, jQuery UI, and also implemented a project using Backbone.js earlier this year which is one of the other Javascript frameworks built to solve a similar type of solution as AngularJS.  I felt like knowing how Backbone.js works helped a lot with picking up AngularJS.


18 QUESTIONS TO ASK BEFORE ADDING NEW TECH TO YOUR WEB APP

2014-01-10

Adding a new piece of technology to your web application is not a consideration to take lightly.  There are a lot of factors to consider that can slow down or doom a project if the proper evaluation is not given up front.  In the end, you want the long term benefit to be worth it, but not derail any short term milestones. And when I say technology, I mean a framework, library, automation tool.  Whatever the type, I use it to encompass anything that you might be considering adding into the technology stack that is new to your web application.  This most often involves something you’ve only read or heard about, or maybe only worked through a tutorial.  This is a case where there is a large unknown component to the technology you want to add. When evaluating adding any new piece of technology to your web development project, use the criteria below to help you make your decision. Does the new technology ______: 1. Address some problems in your software architecture

If you have some software design problems that you consistently struggle with given the tools , libraries, frameworks that you currently use, and this new framework will solve that for you then go for it.  If you are just adding this new framework only to learn it, and it doesn’t add value to your product or software process, then go pick something else to learn that does add some value. 2. Allow you to become proficient in a reasonable time

Depending on the time frame that you have within your development cycle, you may not have a lot of time that can be considered R&D time to learn a new framework.  A new framework should not require a year to become proficient at, that is a lifetime in the development world.  This is also another reason why the skill level of you and your team should be considered.  Master some core technologies first before you start learning something new.  You can always get stuff done with the other languages and frameworks that you already know if you have to, then refactor later. 3. Enable you to create software more quickly and with less effort

Anything that improves your efficiency is something to invest time in.  Always strive to do more with less code. 4. Result in software that is more maintainable

If the new framework best practices result in software that is more maintainable, then in the long run that will pay off.  Your product will be easier to add new features to and be able to be picked up by other developers easier. 5. Result in software that can better adapt to changes

If you have a problem with handling growing complexity without big rewrites and lots of bugs introduced, then integrating a piece of technology that adds to that is going to make things better, it’ll add to your problems.  If on the other hand, using the framework allows for better overall design and encourages solid, maybe even SOLID, design principles, then your software project will be better off. 6. Improve the testability of your software

If testable code is important to you, and it should be, then you should always weigh the impact that adding a new framework has on your ability to test.  One clue to look at is also how the framework tests itself?  That can tell you how much importance it places on testability. 7. Have no significant degradation in performance

If your software designs have problems with performance, and it is really important to your product, then a new framework should be providing a lot of benefits without significantly impacting your software’s performance.  Most of the time, because a framework adds flexibility and adds a layer on top of your existing stack, it often will decrease the performance compared to well-designed code in current tool sets.  The opposite would be writing absolutely optimized custom code for every interaction, but that’s a tradeoff with speed of development and maintainability.  I always opt towards speed of development and functionality first, then look at performance later.  If you know ahead of time performance is valued highly in the product, then make sure you at least have a plan to optimize performance if and when issues come up. 8. Encourage good programming practices

A good framework that you add should be using design patterns that encourage you to write good quality code.  The effort to write good code should be no more than writing bad code so you have no reason to not just write good code using best practices at the start. 9. Have good support by its creators

Sometimes the creators are commercial, sometimes it is open source, sometimes it is a combination where it is open source contributors that are employed by a big commercial company.  Either way, I consider support being the same as documentation, so how well does the project itself keep up with changes in its development with the corresponding documentation.  Checking commit history looking for a variety of committers over a long period of time also helps grow confidence in the project that something that changes in the core developer’s lives or career, or the company’s finances, won’t derail the project. 10. Have good support by its users

Where does the user community get support? These are the same channels you will use to learn and help figure out best practices.  Looking on Stack Overflow to see how many questions are being asked and how well they are being answered is a good gauge (lookup questions using Tags).  Also, seeing what conferences exist and what other companies are using the project helps.  Having someone you have a personal relationship with that has experience and that is willing to help answer some questions is also a plus. 11. Have a good chance to be actively maintained during the useful lifetime of your design

This is something that depends on your product life cycle, if you most likely redesign your product every 3 years, then only has to exist for that long.  If you have to distribute software for a hospital, useful lifetime might be 10 years, so are you confident the new piece of technology will be maintained, updated, and still valid that far in the future? 12. Currently in a state where it is complete and functional

If still in a state of flux, with lots of API changes, or bugs being introduced, it’s not worth using it in your product because you will be constantly working around bugs or wasting time debugging.  Unless you like that sort of thing.  Harder to do if you are working on a product because you are contributing to someone else’s code. 13. Change not too quickly

Will new releases be completely breaking old ones.  If a project is iterating quickly, and your software relies on stable code with infrequent releases, this may not fit into your project well. 14. Allow you to collaborate more easily with other people

If the framework you are adding is not very popular, or not well documented, then if you work on a team with others, it may be frustrating for them to work alongside you.  Also may be hard to find contractors who know the framework.  Ideally you should have the ability to share components you made with the public, or to get them on github or other sources. 15. Minimize complexity added to environment setup for developers and production servers

Does the framework add any complicated steps to the build or test process that will not be able to be automated.  Also, consider the impact on developers setting up a local environment, which is important to truly distributed collaborative work.  Sometimes unavoidable depending on role of the framework. 16. Cost should not be prohibitive

Sometimes the costs are direct, like you have to pay for a license.  Sometimes the costs are secondary, for example, what if a new framework requires a lot more memory usage on your web server, so you have to upgrade your server’s RAM costing you X/month. 17. Have only reasonable requirements to be brought into your product

If a framework has a lot of requirements, need to evaluate their impact too.  Might not be a big deal if you never directly use the required projects and they are abstracted when you use the framework.  But maybe some of them are exposed and new things you have to learn.   18. Have a software license compatible with your product

Have a commercial product?  Make sure the license allows you to sell online, distribute, or sell a subscription to your product, whichever applies depends of course on your monetization strategy.


ANGULARJS DIRECTIVE BEST PRACTICES

2014-01-03

Using directives in AngularJS is one of the great features added to tie complicated javascript functionality and client-side templating to your HTML app in a way that allows for re-use and maintainable code. You can think of a directive as an extension of HTML so that you can create your own elements and attributes. Just like when you use a “<select>” element, you expect to see an element that you can click on and will drop down to have a list of items, and you expect to be able to click one and have that one show up as the “selected” one.  Where a HTML element implies certain functionality, a directive allows us to create our own display elements and/or functionality that can be used as new elements or to extend existing elements. I’ll use the example of a basketball team where we have many basketball players making up a basketball team.  Wouldn’t it be nice if in your HTML you could write this to display a basketball player in HTML?

<basketball-player></basketball-player>

As you might expect to see in HTML, this would output a basketball player with a few fields like name, number, position, and some stats like points and assists.  To accomplish this, it would take a combination of several HTML elements, including <div>, <span>, and maybe an <input> if we wanted to change the number of points and assists in a scorebook type of app.

For the code examples shown on this page, I'm using AngularJS 1.2.7, they should all work with 1.2.*. Here is a link to a plunker showing an example of how to create your own custom directive to do this: http://plnkr.co/edit/BaR0ua?p=preview The basketballPlayer directive is associated with a template file that is HTML with some AngularJS template markup within. Take a look at how I implemented the capability to change the points using an input field.  I can use a directive as an attribute, called ng-model, which is one of the directives provided by AngularJS core. That’s right, many core AngularJS features are directives themselves, a directive can be an element name or an attribute.  This is why understanding directives is one of the most important things to learn and understand when learning AngularJS. As with any technology, there are many ways to approach a solution, and creating directives is no exception. We have some choices to evaluate, a few things to consider include:

  • Using Attribute vs. Element

  • Using proper HTML5/XHTML5 markup

  • Scope considerations for reusable code

Using the element name

<basketball-player></basketball-player>

may seem like a really cool feature of AngularJS and a huge readability improvement to someone going through source code.  However, this has no chance of validating as proper HTML5. Even though it is not proper HTML5, this is the preferred way to use a directive that adds new markup to your app.  Another wise suggestion is to use a prefix (think namespace) for your directives that you use as an element name, which is mainly a future-proofing in case an HTML element comes out that has the same name someday.  Like maybe you were thinking of:

<multiselect>

But what if an upcoming version of HTML5 adds a special multiselect tag and all of the sudden your app breaks.  A suggestion is to use:

<myapp-multiselect>

That way you know for sure it’ll be OK in the future. But something like:

<basketball-player>

I’m pretty sure the chance of that being used in a future release of HTML is none. Having an element name work as a directive is not enabled by default, you need to explicitly allow for it in your javascript code, I keep all my directives in a directives.js file:

var myDirectives = angular.module('myDirectives', []); myDirectives.directive('basketballPlayer', function() { return { restrict: 'AE', templateUrl: 'bball-player-template.html' }; });

The restrict property has an A for Attribute, and an E for Element.  The default, if you don’t specify a restrict property, is A, which means it’s only enabled for Attributes. Notice the name of the directive is “basketballPlayer” but I called the element “<basketball-player>”.  This is an automatic conversion from camel case to lower case with dashes splitting words, it’s an AngularJS thing that you can’t control.  There are lots of possible options that it gets converted into that are valid that allow you to use it in several ways, some help you out with HTML validation. If you are concerned about HTML validation, you can write it also as an attribute:

<div data-basketball-player>

If you are not familiar with the special attribute prefix of “data-“, this is a special name and is allowed within HTML, any attributes with a prefix of “data-“ are ignored and allowed to be custom attributes.  The attribute-based syntax is equivalent to <basketball-player>. This format is valid HTML5, but if you want to step up to XHTML5 we’re not quite OK yet.  Attributes are required to have a value in XHTML5, so most correctly:

<div data-basketball-player="argument">

Even if you don’t have an argument, it’s appropriate to give it a value, recall from plain old HTML:

<select> <option value="1" selected>My selected option</option> <option value="2">Not selected option</option></select>

Notice the selected doesn’t have an = sign behind it.  This is called Attribute Minification. This is allowed in HTML5, but is not proper XHTML5.  So again, this is up to you and how strict you want to be.  The proper XHTML5 form for this select element is:

<select> <option value="1" selected="selected">My selected option</option> <option value="2">Not selected option</option></select>

While I like being strict, I think it’s silly to write selected=“selected” so I opt for not following XHTML5 if that choice is up to me. Within AngularJS, when you create a directive, it requires a small amount of javascript and a corresponding template.  You can determine whether the directive name you have chosen is allowed to be included in the code as an element or as an attribute, or both.  The default is to only allow it as an attribute.  This is the way I prefer, I like being able to run my HTML code through a validator and have it pass.  This is determined by the restrict property of the directive as mentioned earlier in this article. The AngularJS docs suggest that you use an element when you are creating a component that is in control of the template.  Typical situation for this is in some domain-specific code.  They suggest you use an attribute when you are decorating an existing element. In the real world, when looking at documentation online, and help from Stack Overflow and other sites, you will almost always see developers using the most condensed form, using element names and attribute minification.  Some of this is because they are trying to communicate a solution in the simplest manner, but I also suspect this is what most are using within their apps. In my own code, I like using HTML5 validation because it helps me check out all my HTML to make sure I didn’t miss a close or open tag, but I don’t typically go so far as requiring XHTML5 validation. Scope considerations for reusable code You have the option with a directive to isolate the scope, which means to access any variables inside your directive’s template, you need to pass it into the template, using an attribute. Here is an example of the same code from above in a new plunker showing isolate scope: http://plnkr.co/edit/S441rN?p=preview Notice that the directive now includes an additional attribute:

<basketball-player player="basketballPlayer"></basketball-player>

And the directive code says to grab a player directive:

myDirectives.directive('basketballPlayer', function() { return { restrict: 'AE', scope: { player: '=' }, templateUrl: 'bball-player-template.html' }; });

The = sign says to also assign player attribute to the variable of the same name so inside the template, you use player as the variable name, as you can see in the bball-player-template.html file:

<div class="basketball-player"> <div>Name: {{player.name}}</div> <div>Number: {{player.number}}</div> <div>Position: {{player.position}}</div> <div>Points: <input type="text" ng-model="player.points"/></div> <div>Assists: <input type="text" ng-model="player.assists"/></div></div>

If you need to have some two-way data binding inside of your directive, then there are some situations when you cannot isolate scope.  You can isolate scope and still two-way data-bind when you are only binding to objects, but not primitives.  It’s tricky, so keep it in mind as you design your app. Isolating scope is a really good thing, much cleaner, and leads to decoupled code, passing in the objects you need from the outside and nothing more.  So if you do need to two-way data-bind inside your directive, consider tossing your variables into an object and passing that to your directive so you can still isolate scope.

For some good reading about isolate scope and how it all works along with no scope isolation and the transclude option, check out this stack overflow question: Confused about Angularjs transcluded and isolate scopes & bindings AngularJS Directive Best Practice Guidelines

  1. Use your directive as an element name instead of attribute when you are in control of the template

  2. Use your directive as an attribute instead of element name when you are adding functionality to an existing element

  3. If you do use a directive as an element, add a prefix to all elements to avoid naming conflicts with future HTML5 and possible integrations with other libraries.

  4. If HTML5 validation is a requirement, you’ll be forced to use all directives as attributes with a prefix of “data-“.

  5. If XHTML5 validation is a requirement, same rules as HTML5 validation except need to add “=“ and a value onto the end of attributes.

  6. Use isolate scope where possible, but do not feel defeated if you can’t isolate the scope because of the need to two-way data-bind to an outside scope.


GOOGLE CHART TOOLS PRESENTATION

2013-02-22

Here is a link and embed of a presentation I gave to the Boise Google Developers Group a couple weeks ago.  I presented about Google Chart Tools, which is a web data visualization package provided by Google to use.  It is a Javascript API to create interactive, nice looking charts to dress up a data-driven website.  I have used Google Chart Tools in several projects for clients and myself, and find them to be easy to use and stable.

Knowing that any solution to a problem first needs a problem, I begin the presentation with a list of the requirements that a particular project for a client had regarding Data, Tools, and Development environment.  I then proceed through the many web-based data visualization solutions out there and show why Google Chart Tools fit my requirements best.  Then, I have a quick, general overview of the Google Chart Tools features then leave the rest of the details for you to explore on the site which includes a Code Playground and Chart Gallery.

Link: http://prezi.com/hacdlbxeoroe/choosing-a-web-data-visualization-solution...

https://prezi.com/embed/hacdlbxeoroe/


23 QUESTIONS YOUR WEB PROJECT REQUIREMENTS SHOULD ANSWER

2013-01-11

When you are writing your requirements for your next web project, here are some handy questions to ask yourself to make sure that you are doing an effecitve job.  Being a web developer myself, I've seen a lot of variety of requirements from different clients.  From no requirements, to well thought-out and concise requirements.  Realize, that projects with no requirements always end up with requirements by the time we are done discussing your project, so just do them ahead of time.  Specifically, by a list of requirements, I mean written down, clear requirements about the web site and the environment the web site will operate in.

When a potential client comes to me with well written requirements, I know that this web project isn't some random idea that a person isn't serious about.  Also tells me that you have a clue about web sites and running a project, which in my experience always leads to a better relationship and better outcome.  I am a lot more likely to take your project if we can communicate, and the requirements and our initial interview is often all I have to go by.

Why are writing requirements important?

Writing good requirements are most people's least favorite thing to do, but are important in so many ways.

  • Clearly set expectations

  • Allows your web developer to accurately estimate time (so you stay on budget)

  • Makes any requirements meetings before the project starts more efficient (nobody likes to waste time)

  • Your potential web developer will know you are serious and is more likely to take your project

  • Less communication needed during the completion of the project (no wasted time)

All of the tips I'm offering to you are part of my initial interview process that I go through with potential clients and their projects.  This is BEFORE the project is started.  So if these questions are answered in the requirements before we initially talk, the initial interview goes smooth and we can talk about more exciting stuff, like brainstorming the ways your web project can help you in ways you never thought of.

You'll also find that these tips center around figuring out how your web project fits into your business.  This is something your web developer needs to understand.  If I work on your project, I must understand your business so I can make appropriate decisions as I develop the site.  I also can then recommend small, little things that might make a big difference in how your users interact with the site.

Does your pizza delivery guy need to know about pizza?

You wouldn't send a pizza delivery guy out without understanding pizza.  He wouldn't realize that it needs to be delivered hot as a priority, and he wouldn't understand that people might want sprinkle cheese and pepper with their pizza.  He might even flip the pizza box over and ruin all that cheesy deliciousness if he doesn't know what a pizza is.  So in the same way, please make sure your web developer can understand your business before letting them loose on your project.

So here are the questions to ask yourself when writing requirements for your web project.

1. What is the business purpose of your site, how does it fit into your overall business model?

Without knowing the purpose and how it fits in, what will drive the little details of where things are placed, and how things are done.  Don't have your pizza delivery guy know nothing about the pizza.

2. What goals do you have for visitors of your site?

Do you want people visiting your site buy something?  Share something?  Signup for something?  This is really important for layout of your web pages, and how the site is designed to funnel people towards those goals.  Just reading an article is rarely the goal, you want people to form a connection with you, so make it easy for them to do so.

In addition, knowing the goals allows us to put the proper analytics in place to make sure we are tracking those goals.

3. How will your customers reach your site?

Search, Ads, Social media?  Sure, you say all of them right, but what is the reality?  Do you know where they are coming from now if you have an existing site?

4. What geographic location of people does your site serve?

If you are only targeting local people, then the web site should reflect that and it should be obvious to visitors of your site that you are a local company.  Also helps to figure out what your methods to reach out to people should be.  Its easier for local businesses to focus efforts on a small area, than a bigger area like the whole US.

5. What are some examples of similar sites that you like?

This doesn't mean: What site should I copy?  As unique of an idea as you have, there are almost always people who have done similar things, reinventing the wheel is not good.  Even if its bits and pieces from several different sites, this is a tremendous help for a designer to get what color schemes you like, and what navigation you like.

It's also important to know what you don't like.  If you don't like big image sliders at the top of the home page of sites, please tell somebody.  Save everybody some time.

6. How will the web site be hosted?  What are the capabilities?

If you already have a hosting solution, or know what you are going with, this is very important to know.  Why?  What are the hosts capabilities?  The site that is designed must fit into these parameters.  Also, right along with this is what are your backup requirements for your files and database.  Designing these into a system can take some time, so include it in your requriements.  You have thought about backups, right?

7. How many people will have logins to the site?

Its just an estimate.  Also, how many of those people will be members of your organization, and how many will be customers?  Its important for the web developer to have an idea of the type of internal security that is needed, and what roles will be necessary to protect content from internal vs. external vs. anonymous users.

8. What user authentication methods will you use?

When users register, do you want to just user regular old user/password that is saved in your own site's database?  Or do you want to allow Login with Google, Facebook, OpenID?  Or is this an internal site that you want to use an existing login system like LDAP?

9. How many users will be allowed to contribute content and what kind of technical ability do they have?

Designing a rich text editor for a single person with lots of technical experience is a lot easier than designing one that will be stripped down so that a non-technical person can't make posts that look bad.  A technical user can be trusted with a lot more control over the way the content looks and is formatted.

10. What kind of content will people add?

That helps determine the work required to theme the individual page templates.  Typically, individual content types will have their own template, which just means the layout of the individual fields within each content type might be different enough to have its own special HTML/CSS page layout.

Knowing the different type of content also helps to imply what other kind of views might be needed.  Such as, if you have an Event type of content, then it implies you will have a calendar view, and possibly an upcoming events view.  This is another really important part to have for estimating time properly.

11. What roles will users be able to have?

This mainly has to do with security, but also usability.  This is what user groups the users fall into, those user groups can have permissions extended to them.

The security part is to make sure that only certain types of users can add an Event, but that other users cannot.  Maybe you have certain users that are superusers and can edit or delete any existing Event content.

For usability, if a person cannot edit an Event, then they should not see an "edit" link.  Its important in the usability of a site to only have the valid actions presented to a user.

12. How will users interact with the content?

Do you want users to be able to comment on particular types of content?  Do you want them to share on social media using share buttons?  Which social media outlets?  Just putting them all on there is pointless, too many options leads to indecision, narrow down the most important sources and include those.  Can always change later.

13. Any restrictions on technology or licensing used?

An example of this would be no Flash used for videos.  This is probably more important for internally developed software, but it needs to be discussed.  Its a given that the license will be need to be compatible with your intended delivery method, as there are different restrictions if you are selling the software, or just using it internally.

14. What devices do you want to target?

This is where designing for the small screens on mobile devices comes in.  Its also good to prioritize the screens you design for, whether it is PC, tablet, mobile.  All comes down to effort required and you can save money on your project if you can keep the design flexible (buzzword: responsive) enough to work on all devices with a single theme layout.

15. Do you want a single site for mobile?

When it comes to mobile design, there are a couple broad options: single site that does all sizes of devices, or a mobile-only device.  The trend, and the better way in my opinion, is to go with the single site that is flexible to shift with screen size.

16. Do you have any graphics or color scheme that will be provided?

Already have a logo?  Already have a vast library of stock images that will be used?  It's important to mention this so your graphic designer knows what they have to work with.  If your brand has a specific color scheme,  mention that it needs to be adhered to.

17. What are the metrics for success?

This is related to what goals you have for embarking on this web project, but list out what a successful web project completion would mean to your core metrics.  Increased visits?  Increased shares?  More sales or signups?  This helps communicate what is truly most important to you so expectations are clear.

A big part of this is also knowing what those metrics are currently.  Or if you don't have an existing site, what you estimate them to be.  Use of analytics in a web project is a MUST, you need to be able to track your progress, at least to ensure that your web project doesn't cause you to take a step backwards when completed.

18. What are your frustrations with your current site?

You have built up experience using your current site, or even other similar sites, so communicate those frustrations.  They will be #1 on your developer's list of things to take care of on the new project.

19. What do you want to keep the same as the old site?

This is important too, if you like something, its important to understand why you like it so that if possible, it can be incorporated into the new site.  At the very least, a similar feature can be implemented to give you the same benefits.

20. What methods will you use to drive traffic?

If you drive traffic through advertisements, it may mean that you will want to be able to create landing pages easily and track the metrics.  If you are collecting signups on your landing pages, will possibly want to tightly integrate if you are having to make new signup forms often.

21. How will you send email from the site?

Will you have the capability of sending email from your web hosting company, or will you be using a 3rd party like MailChimp to collect signups and send followup emails.

22. Are you taking payments on your site?

Who is your payment gateway and processor?  What kind of products or services are you selling?  This also helps to understand costs incurred with PCI compliance and other taxation factors.

23. Do you need an SSL certificate?

Are you wanting to protect a shopping cart, or the admin area, or both?